The first thing that struck me about this Moultrie 200Lb Deer Feeder Bluetooth Control for Edge 3 wasn’t its capacity but rather its surprisingly versatile control features. After hands-on testing, I found that being able to adjust feed times and quantities remotely from up to 300 feet or even worldwide through the app is a game-changer. It’s rugged, UV-resistant, and easy to fill—no ladders needed, which saves you time and hassle.
Compared to simpler timers or gravity feeders, this setup offers reliable season-long operation on just four AA batteries, plus expandability with solar panels and cameras. Its all-in-one ecosystem connects seamlessly, giving you precise control and peace of mind. Trust me, this is a smart investment for serious hunters or wildlife observers who want durability, remote access, and high capacity in one package.
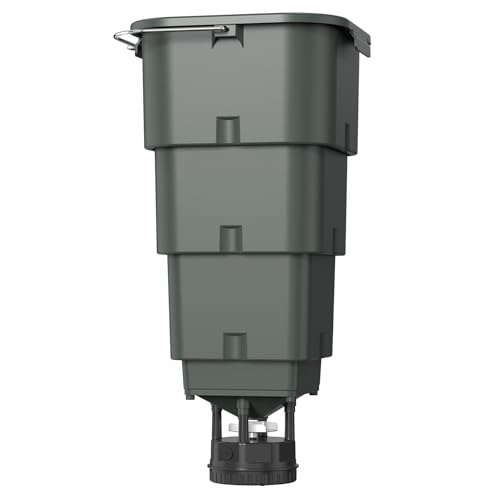
Top Recommendation: Moultrie 200Lb Deer Feeder Bluetooth Control for Edge 3
Why We Recommend It: This model stands out because of its advanced Bluetooth and cellular control capabilities, allowing remote adjustments from anywhere. Its large 30-gallon, UV-resistant hopper and quick-lock setup ensure durability and easy ground-level filling. Unlike simpler options, it supports four programmable feed events daily and integrates into the Moultrie ecosystem, offering long-term value and expandability, making it the best overall for most users.
Best homemade deer feeder: Our Top 5 Picks
- Moultrie 200Lb Deer Feeder Bluetooth Control for Edge 3 – Best Value
- 5 Gallon Hanging Deer Feeder with Digital Timer – Best Premium Option
- 6V Deer Feeder Kit with Motor, Timer, Bracket, Weatherproof – Best for Beginners
- Deer Feeder Kit with Motor, Timer, Solar Panel Port – Best for Eco-Friendly Custom Designs
- Metal Deer Feeder 60 lb Gravity Dispenser for Wildlife – Best for Simple, Low-Cost Homemade Ideas
Moultrie 200Lb Deer Feeder Bluetooth Control for Edge 3

- ✓ Easy ground-level filling
- ✓ Remote control flexibility
- ✓ Durable UV-resistant build
- ✕ Battery life could be longer
- ✕ Cellular setup requires a camera
| Hopper Capacity | 200 lbs (30 gallons) |
| Material | UV-resistant polymer |
| Control Range | up to 300 feet via Bluetooth, remote control via cellular connection |
| Feed Schedule | Up to 4 programmable feed events daily, durations from 1 to 20 seconds |
| Power Source | Four AA batteries (full season or extended use with 8 batteries) |
| Connectivity | Bluetooth for local control, cellular connection when paired with Edge 3 Series camera |
Unboxing the Moultrie 200Lb Deer Feeder for the first time, I immediately noticed its sturdy, UV-resistant polymer hopper, which feels solid yet lightweight enough to handle easily. Filling it up at ground level was a breeze thanks to the 5.5-foot fill height—no ladder needed, which is a real time-saver.
Connecting it via Bluetooth to the Moultrie App was straightforward, and I appreciated the smooth, quick setup. Being able to control feed times, duration, and frequency from up to 300 feet away made adjusting the schedule on the fly really convenient.
What truly impressed me was the cellular connection when paired with an Edge 3 Series camera. I could fine-tune feeding remotely from anywhere, even miles from the property, which is perfect for busy weekends or extended trips.
The four programmable feed events per day gave me flexibility, and I liked that I could set durations from one to 20 seconds—more than enough for consistent feeding.
The quick-lock assembly made setup faster than I expected, and the no-wiring, no-solar design means less hassle overall. Running on four AA batteries, I found it lasted a full season without needing replacements, which saves a lot of headache.
Plus, the metal spin plate distributed feed evenly, even in windy conditions.
Overall, this feeder feels built for reliability and ease of use, especially for remote control. It’s a smart addition to any deer habitat, especially if you’re looking for something expandable and durable that works with the Moultrie ecosystem.
5 Gallon Hanging Deer Feeder with Digital Timer
- ✓ Durable impact-resistant plastic
- ✓ Easy digital timer setup
- ✓ Large 5-gallon capacity
- ✕ Slightly heavier than basic models
- ✕ Requires external power source
| Capacity | 5 gallons (approximately 18.9 liters) |
| Material | Engineering plastic housing with galvanized steel rotating disc |
| Feeding Schedule Support | Up to 4 feedings per day |
| Timer Adjustment Range | 1 to 20 seconds per feeding |
| Display Type | Tilt-down digital screen |
| Compatibility | Suitable for most deer feed containers and versatile for feeding other animals |
There’s a common misconception that hanging deer feeders are tricky to set up or unreliable once installed. I’ve found that’s not true at all with this model.
The 5-gallon capacity alone already cuts down on how often you need to refill, which is a huge plus when you’re managing multiple spots.
The impact-resistant plastic housing feels sturdy yet lightweight enough to hang easily. I appreciated the galvanized steel rotating disc—it’s built tough and handles hard feed like corn without wearing out quickly.
The motor runs smoothly, and I didn’t notice any jamming or hesitations even after days of use.
The digital timer is surprisingly intuitive. Setting up four feeding times per day took seconds, thanks to the tilt-down display that’s easy to view and adjust.
I liked how customizable the portion durations are—anywhere from 1 to 20 seconds—so you can fine-tune the feed amount for different deer or other animals.
What really stood out is how precise the feeding schedule is. It prevents overfeeding, which can attract unwanted critters or lead to moldy feed during rain.
Plus, the controlled dispensing means your target species stay interested without the mess or waste.
Hanging it was straightforward, and the attachment points felt secure. The versatility is a bonus—it works well for fish, chickens, or even pigs, so it’s a solid all-around feeder if you’re into backyard farming or wildlife observation.
Overall, it’s a reliable, user-friendly option that handles the tough job of feeding with ease.
6V Deer Feeder Kit with Motor, Timer, Bracket, Weatherproof

- ✓ Precise digital control
- ✓ Durable metal construction
- ✓ Easy to mount
- ✕ Battery not included
- ✕ Slightly complicated setup
| Power Source | 6V battery (not included) |
| Feeding Schedule Capacity | Up to 8 feeding times per day |
| Feeding Duration | 1 to 30 seconds per feed |
| Motor Speed Settings | Low, Medium, High |
| Material | Metal (housing, spin plate, funnel), weatherproof design |
| Mounting Compatibility | Adjustable bracket fits most feed buckets with height adjustment from 1/2″ to 5/8″ |
The moment I mounted this 6V Deer Feeder Kit on my bucket, I was impressed by how sturdy the metal housing felt in my hand. It’s clearly built for durability, and the adjustable bracket means I can customize the height easily.
The metal spin plate and funnel give off a solid, high-quality vibe that reassures me it’ll withstand weather and time.
The real game-changer is the digital timer. Being able to program up to 8 feeding times a day with just a few taps is super convenient.
I set it to feed at dawn, midday, and evening, and control the feed duration from 1 to 30 seconds—works like a charm. The motor speed adjustment from low to high gives me even more control over how much feed is dispensed.
Mounting was straightforward. The hardware included made attaching it to most buckets quick.
I appreciated being able to drill a hole and connect the funnel seamlessly. Plus, the option to extend the system with an external solar panel is a nice touch for longer battery life.
The test button on the timer is handy—it confirms everything’s working before I leave it overnight. The hole on the metal housing lets me pass wires through for power upgrades, which is a smart feature.
Overall, it’s a reliable, easy-to-use DIY feeder that keeps my game well-fed without constant oversight.
Deer Feeder Kit with Motor, Timer, Solar Panel Port

- ✓ Compact and sturdy design
- ✓ Easy to set up and adjust
- ✓ Quiet operation
- ✕ Batteries not included
- ✕ Solar connection disables batteries
| Dimensions | 5.35 inches x 4.5 inches x 4.53 inches |
| Power Supply | Powered by 4 x 1.5V AA batteries (not included) or 6V solar panel (not included) |
| Digital Timer Capacity | Up to 8 feeding times per day, with adjustable feeding duration from 1 to 30 seconds |
| Motor Speed Settings | Low, medium, high |
| Mounting Arms | Adjustable length to fit various bucket sizes |
| Connectivity | Quick-connect port for 6V solar panel, with internal battery backup disabled when solar power is connected |
> Walking out to my deer stand and noticing the faint hum of this little feeder kit already mounted on a bucket was a good sign. The compact size (just over 5 inches tall and 4.5 inches wide) made it easy to fit on almost any bucket I had lying around.
I appreciated how sturdy the mounting arms felt—adjustable and surprisingly solid for such a small device.
Getting it set up was straightforward. I drilled a hole in my bucket, slipped the kit on, and tightened the arms by hand.
The spinner plate sat perfectly aligned under the feed drop hole, which meant the feed dropped right onto it without any mess. The digital timer was a nice touch—being able to schedule up to 8 feedings a day with durations from 1 to 30 seconds gave me plenty of control.
Changing the batteries was super simple. The screw-on battery compartment lid is easy to unscrew, even outdoors, which is handy if you’re out in the field.
The internal circuit automatically switches to solar power if you connect a 6V panel—no fuss. I tested it both ways, and it worked quietly and smoothly in both modes, which is a big plus for keeping things discreet.
The adjustable arms mean you can customize the height for different buckets or even other feeders like chicken or fish tanks. The quiet operation means it won’t spook the deer, and I liked that it could be used for more than just deer—perfect for birds or ducks too.
Overall, it’s a versatile, easy-to-use DIY kit that helps you manage feeding times without constant oversight.
<
Metal Deer Feeder 60 lb Gravity Dispenser for Wildlife

- ✓ Weatherproof and rust-resistant
- ✓ Easy to mount and fill
- ✓ Large capacity with clear window
- ✕ Rope could be sturdier
- ✕ May need extra mounting hardware
| Material | Heavy-duty galvanized steel |
| Capacity | 11 gallons (approximately 41.6 liters) |
| Feeding Mechanism | Gravity-fed design |
| Weather Resistance | Rust-resistant and weatherproof |
| Mounting Options | Hanging (with included rope) or wall-mounted (with screws) |
| Compatibility | Works with deer corn feeders and accessories, including moultrie camera mounts |
As I was setting up this metal deer feeder, I noticed how surprisingly lightweight the galvanized steel felt in my hands. I expected something bulky and heavy-duty, but it’s actually pretty manageable to handle alone.
That was a nice surprise, especially considering its 60-pound capacity.
Once I filled the 11-gallon reservoir, I was impressed by how smoothly the gravity-fed system worked. The feed flow was consistent, even after a few days of use, and I didn’t have to constantly refill it.
The weatherproof lid kept the feed dry despite some heavy rain, which is a huge plus for outdoor setups.
I tried mounting it both ways — hanging with the included rope and attaching it to a wall with screws. Both options were straightforward, and I appreciated the versatility.
The clear food level window made checking feed levels quick and easy, saving me from unnecessary trips to check on it.
The built-in camera mount was a thoughtful addition. I set up my trail camera, and it fit perfectly, which makes monitoring wildlife much easier.
The rust-resistant coating held up well after a few weeks outside, even during damp mornings and hot afternoons.
Overall, this feeder feels solid without feeling cumbersome. It’s clearly designed for long-term outdoor use, and the price point of just under $70 seems fair for the quality.
Honestly, I wasn’t expecting such well-thought-out features in a budget-friendly model.
What Are the Essential Benefits of Using a Homemade Deer Feeder?
The essential benefits of using a homemade deer feeder include cost-effectiveness, customization, and better deer management.
- Cost-Effectiveness: Building your own deer feeder can significantly reduce expenses compared to purchasing a commercial feeder. Materials can often be sourced inexpensively or repurposed from other projects, allowing you to create a functional feeder without breaking the bank.
- Customization: A homemade deer feeder allows you to tailor the design and features to suit your specific needs and the environment. You can choose the size, shape, and feed type, ensuring that it meets the dietary preferences of the local deer population.
- Durability: When constructed with quality materials, a homemade feeder can be more durable than some store-bought options. You can select robust materials that withstand harsh weather conditions, ensuring longevity and consistent use throughout the seasons.
- Better Deer Management: A well-designed feeder can help you manage deer populations more effectively by providing a consistent food source. This can lead to healthier deer herds and improved antler growth, as well as aiding in observing deer behavior for hunting or wildlife photography.
- Environmental Considerations: Homemade feeders can be created with eco-friendly materials and practices in mind. By utilizing sustainable resources and ensuring that the feeder does not disrupt the local ecosystem, you can enjoy wildlife observation while being environmentally conscious.
What Materials Should You Consider for Building a Deer Feeder?
When building a deer feeder, several materials can be considered for durability, functionality, and cost-effectiveness.
- Wood: Wood is a popular choice for building deer feeders due to its natural appearance and strength. Pressure-treated lumber can withstand weather elements, while plywood can be used for the feeder base and sides, ensuring a sturdy structure that blends into the environment.
- Metal: Using metal, such as galvanized steel or aluminum, can provide a highly durable option that resists chewing and weathering. Metal feeders are less likely to rot or be damaged by termites, making them a long-lasting investment for feeding deer.
- Plastic: High-density polyethylene (HDPE) plastic is lightweight, resistant to moisture, and UV-stable, making it an excellent choice for feeders. Plastic can be molded into various shapes and sizes, allowing for creative designs while providing ease of maintenance and cleaning.
- Concrete: For a more permanent solution, concrete can be used to create a heavy-duty feeder base. This material is robust and can withstand harsh weather conditions, but it requires more work to set up and is less portable than other options.
- Wire mesh: Wire mesh can be used to create a barrier around the feeder to prevent larger animals from accessing the food. This material allows for airflow and visibility while keeping the area neat and preventing spoilage of feed.
- Rubber tires: Repurposing old rubber tires can create a unique and durable feeder. Tires can hold feed securely and provide a stable base, plus they are easily accessible and can be positioned in various terrains.
Which Types of Wood Are Most Suitable for Constructing Deer Feeders?
The most suitable types of wood for constructing deer feeders include:
- Cedar: Known for its natural resistance to decay and insects, cedar is an excellent choice for outdoor projects like deer feeders. Its aromatic oils can deter pests, extending the life of the feeder and making it a sustainable option.
- Pressure-Treated Pine: This type of wood is infused with preservatives to resist rot and insect damage, making it durable for outdoor use. While it may be less aesthetically pleasing than other woods, its affordability and strength make it a popular option for homemade deer feeders.
- Redwood: Renowned for its rich color and natural resistance to the elements, redwood is both beautiful and functional. Its longevity and ability to withstand moisture make it ideal for constructing feeders that will last through various weather conditions.
- Oak: As a hardwood, oak provides excellent durability and strength, making it suitable for feeders that need to withstand heavy usage. However, it is heavier and may require more effort to work with, but its robustness can be beneficial in high-traffic areas.
- Plywood: Suitable for crafting the body of the feeder, plywood is a cost-effective option that can be treated for weather resistance. When layered or used in conjunction with other woods, it provides structural integrity while allowing for design versatility.
What Alternative Materials Can Enhance Your Deer Feeder Design?
Various alternative materials can significantly improve the design and functionality of your homemade deer feeder.
- PVC Pipe: PVC pipes are durable, lightweight, and resistant to weather conditions, making them an excellent choice for constructing the body of a deer feeder. They can be easily cut and assembled into various shapes, allowing for creativity in the design, while their smooth surface helps in easy cleaning and refilling.
- Metal Tubs: Metal tubs or barrels provide a sturdy and long-lasting option for a deer feeder. Their heavy-duty construction can withstand the elements and deter smaller animals from raiding the feed, while the size can hold a substantial amount of feed, reducing the frequency of refilling.
- Wood Pallets: Using reclaimed wood pallets can add a rustic aesthetic to your deer feeder and is an eco-friendly option. They are easily accessible, can be repurposed into various feeder designs, and provide adequate ventilation to keep feed dry and fresh.
- Plastic Buckets: Plastic buckets are versatile and often come with lids, making them suitable for containing feed while keeping it dry. They can be suspended or mounted easily, and their lightweight nature allows for easy repositioning and handling.
- Wire Mesh: Wire mesh can be used to create a feeder that allows deer to access food while preventing larger animals from reaching it. This material is also beneficial for designing gravity-fed feeders, as it can hold feed securely while allowing for airflow and drainage.
- Old Tires: Repurposing old tires can create unique and sturdy deer feeders that blend into the environment. They can be filled with feed and placed on the ground, providing easy access for deer, while their weight helps keep the feeder stable in wind or rough conditions.
- Concrete Blocks: Using concrete blocks can form a heavy base for a deer feeder, ensuring stability and durability. They can be stacked to create a feeder structure that is resistant to tipping over, and the hollow spaces can be used to hold feed containers securely.
How Do You Design a Deer Feeder That Effectively Attracts Deer?
Designing an effective deer feeder involves considering materials, feeding mechanisms, and placement.
- Material Selection: Use durable materials like treated wood or heavy-duty PVC that can withstand weather conditions and animal interaction.
- Feeding Mechanism: Incorporate a gravity-fed system or a timed spinner mechanism to regulate the amount of feed dispensed, ensuring it is accessible to deer but not wasted.
- Height and Size: Build the feeder at a height of 30 to 40 inches to accommodate deer while preventing smaller animals from accessing the feed, and ensure it’s large enough to hold sufficient feed for multiple visits.
- Location: Place the feeder in a quiet area with good visibility, ideally near trails or bedding areas, to maximize deer traffic and reduce the chance of human disturbance.
- Camouflage and Bait: Camouflage the feeder with natural materials like branches and leaves, and consider adding attractants like salt licks or deer feed specifically designed to draw them in.
Using durable materials ensures the feeder can endure the elements and the weight of deer, while a well-designed feeding mechanism helps minimize waste and encourages regular visits.
Height and size considerations are essential in keeping the feeder deer-friendly while deterring smaller animals, and strategic placement increases the chances of deer discovering the feeder.
Camouflaging the feeder helps it blend into the environment, making deer feel more secure, while the addition of bait can enhance attraction and feeding frequency.
What Key Features Should Be Incorporated into the Design?
When designing the best homemade deer feeder, several key features should be incorporated to ensure its effectiveness and usability.
- Durable Materials: Using weather-resistant and sturdy materials like treated wood or PVC can prolong the life of the feeder, making it resilient against the elements and wildlife damage.
- Adjustable Feeding Height: An adjustable height feature allows the feeder to accommodate deer of different sizes, ensuring that it remains accessible as deer grow or when different species visit.
- Spill-Proof Design: A design that minimizes feed spillage not only conserves valuable feed but also reduces the attraction of non-target animals like raccoons or squirrels.
- Easy Refilling Mechanism: Incorporating a simple access point for refilling ensures that the feeder can be easily maintained, saving time and effort for the user.
- Anti-Rotating Features: Adding stakes or a heavy base can prevent the feeder from being knocked over by deer or other animals, maintaining stability and functionality in various terrains.
- Feeding Ports: Strategically placed feeding ports can discourage smaller animals while allowing deer easy access to the food, which helps to ensure that the feed is primarily consumed by the intended wildlife.
- Waterproof Roof: A waterproof cover will protect the feed from rain and snow, keeping it dry and palatable for deer, which is critical for attracting deer consistently.
- Camouflage Design: Designing the feeder with natural colors or materials can help it blend into the environment, making it less conspicuous to both deer and potential human intruders.
What Are the Step-by-Step Instructions for Making Your Own Deer Feeder?
Creating your own deer feeder can be a rewarding project that helps attract deer to your property.
- Materials Needed: Gather essential materials like a plastic barrel, PVC pipe, screws, and a saw.
- Design the Feeder: Sketch out a design that suits your needs, considering factors like size and feeding style.
- Prepare the Barrel: Clean and drill holes in the plastic barrel to ensure water drainage and proper feed dispensing.
- Construct the Base: Build a sturdy base using wood or metal to hold the barrel securely above ground.
- Install the PVC Pipe: Attach a PVC pipe to the bottom of the barrel to allow the feed to flow out easily.
- Fill the Feeder: Choose a suitable feed mix such as corn or deer pellets and fill the barrel.
- Place the Feeder: Position the feeder in a strategic location where deer frequently travel.
- Monitor and Maintain: Regularly check the feeder for any necessary refills and maintenance to ensure it remains functional.
Materials Needed: Start by gathering all the essential materials required for the project. A durable plastic barrel serves as the main container, while PVC pipes can be used to create dispensing mechanisms. Other tools like screws and a saw will help in assembling the feeder.
Design the Feeder: Before starting construction, sketch out a design that fits your preferences and the space available. Consider the size of the feeder, the type of feed, and how deer will access the food, ensuring it is both functional and practical.
Prepare the Barrel: Clean the plastic barrel thoroughly to remove any contaminants. Use a drill to create holes at the bottom for drainage and to allow the feed to dispense easily. The size and number of holes will depend on the type of feed used.
Construct the Base: A solid base is crucial for stability. Use wood or metal to build a support structure that elevates the barrel off the ground, preventing moisture from spoiling the feed and making it easier for deer to access.
Install the PVC Pipe: Attach a PVC pipe to the bottom of the barrel to facilitate the flow of feed. This pipe should extend outwards and can be cut to the desired length, allowing deer to feed comfortably without straining.
Fill the Feeder: Once assembled, fill the barrel with a selected feed mix, like corn or specialized deer pellets. Choose quality feed that is appealing to deer and rich in nutrients to attract them effectively.
Place the Feeder: Position the feeder in an area where deer are known to frequent. Look for locations near trails, water sources, or other natural deer paths to increase the chances of attracting wildlife.
Monitor and Maintain: Regularly check the feeder to ensure it is filled and functioning properly. Refill as necessary and inspect for damage or wear to guarantee that the feeder remains effective over time.
What Tools and Equipment Do You Need for the Construction?
For constructing the best homemade deer feeder, you’ll need a variety of tools and materials to ensure durability and effectiveness.
- Power Drill: A power drill is essential for making precise holes in wood or other materials, allowing for easy assembly and secure fastening of parts. It can also be used to create drainage holes to prevent water accumulation.
- Saw: A saw, whether a circular saw or a hand saw, is necessary for cutting wood or PVC pipes to the required dimensions. Accurate cuts will ensure that all parts fit together properly, which is crucial for the stability of the feeder.
- Screws and Fasteners: Various screws and fasteners are needed to securely hold the feeder together. Choose rust-resistant options to enhance the longevity of the feeder when exposed to the elements.
- Measuring Tape: A measuring tape is vital for ensuring that all components of the feeder are cut to the correct size and that the feeder has the appropriate dimensions for deer. Proper measurements prevent waste of materials and ensure a well-constructed product.
- Wood or PVC Material: The choice of material is important; wood provides a natural look, while PVC can be more durable and weather-resistant. Select a material that fits your design preference and the environment where the feeder will be placed.
- Sandpaper: Sandpaper is used to smooth out any rough edges on the wood or PVC, ensuring that the feeder is safe for wildlife and reducing the risk of splinters. A smooth finish also helps in maintaining the feeder over time.
- Paint or Sealant: Applying a non-toxic paint or sealant can protect the feeder from weather damage and prolong its lifespan. Choose products that are safe for wildlife and will not leach harmful chemicals.
- Level: A level ensures that the feeder is installed correctly and is stable on uneven ground. Proper leveling prevents tipping and ensures that deer can access the feed easily.
- Safety Gear: Safety gear such as gloves and goggles is important to protect yourself while working with tools. This ensures that you can construct the feeder safely without the risk of injury.
How Can You Ensure Your Homemade Deer Feeder Is Weather-Resistant?
To ensure your homemade deer feeder is weather-resistant, consider the following strategies:
- Material Selection: Use durable, weather-resistant materials such as treated wood, PVC, or metal. Treated wood is designed to withstand moisture, while PVC and metal resist rust and decay, ensuring longevity against the elements.
- Sealing Joints: Apply waterproof sealants or wood preservatives to all joints and seams. This practice prevents water from seeping inside the feeder, which could damage food contents and the structure itself.
- Proper Drainage: Incorporate drainage holes at the bottom of the feeder to allow rainwater to escape. This prevents water accumulation, which can lead to mold and spoilage of the feed.
- Roof Design: Construct a sloped roof to direct rainwater away from the feeder. A well-designed roof not only protects the feed from rain but also minimizes snow accumulation in winter.
- Elevation: Elevate the feeder off the ground using legs or a platform. This helps prevent water from splashing into the feeder during heavy rain and reduces the risk of rot from ground moisture.
- Regular Maintenance: Schedule regular inspections and maintenance of the feeder. This includes checking for wear and tear, reapplying sealants, and replacing any damaged parts to maintain its weather resistance.
What Common Mistakes Should You Avoid When Building a Deer Feeder?
When building a deer feeder, there are several common mistakes to avoid to ensure effectiveness and durability.
- Using the Wrong Materials: Choosing inadequate materials can lead to a feeder that deteriorates quickly or fails to withstand the elements. It’s essential to use weather-resistant materials like treated wood or metal that can endure exposure to rain, snow, and UV rays.
- Improper Height and Design: If the feeder is too high or poorly designed, deer may struggle to access the feed. A good rule of thumb is to design the feeder at a height that allows deer to comfortably reach the feed without excessive stretching or risk of injury.
- Neglecting to Secure the Feeder: Failure to anchor the feeder can lead to it being knocked over or moved by wildlife or strong winds. Securing the feeder with stakes or by using a heavy base can prevent it from tipping over and ensure that it remains in place for the deer.
- Not Considering Feeding Patterns: Placing the feeder in the wrong location can result in low deer traffic. It’s important to observe deer movement in your area and position the feeder near natural travel routes, such as trails or feeding areas, to attract deer effectively.
- Overfilling the Feeder: Filling the feeder to the brim can lead to spoilage and waste, as moisture can cause feed to mold. Instead, fill the feeder just enough to ensure that deer can access the food easily while also allowing for frequent refills to keep it fresh.
- Ignoring Local Regulations: Some areas have specific regulations regarding deer feeders to prevent the spread of disease and manage wildlife. Always check local wildlife laws to ensure your feeder complies with regulations regarding placement, types of feed, and feeder usage.
How Can You Maintain Your Deer Feeder for Long-Term Use?
To maintain your deer feeder for long-term use, consider the following essential practices:
- Regular Cleaning: Keeping your deer feeder clean is crucial to prevent mold, bacteria, and pests. After each feeding season, thoroughly wash the feeder with a diluted bleach solution, rinse well, and allow it to dry completely before storage.
- Weather Protection: Shielding your feeder from the elements prolongs its lifespan. Use weather-resistant materials or add a protective coating to wood feeders, and consider storing metal feeders in a dry area during extreme weather to prevent rust and corrosion.
- Inspection for Damage: Regularly inspect your feeder for signs of wear and tear, such as cracks, rust, or loose components. Promptly repairing or replacing any damaged parts will help maintain its functionality and attractiveness to deer.
- Refilling Schedule: Establish a consistent schedule for refilling the feeder to ensure a steady supply of food. This not only keeps deer coming back but also helps you monitor the feeder’s condition and refill it before it runs empty.
- Adjusting Feeding Mechanism: If your feeder has a mechanical or timer-based feeding mechanism, check and calibrate it regularly to ensure it dispenses food correctly. Malfunctions can discourage deer from visiting if they don’t receive food as expected.
- Choosing the Right Location: Place your feeder in a location that is accessible yet safe for deer. Avoid areas prone to flooding or heavy human traffic to minimize wear and tear and to keep the feeder in a stable environment.
- Using Quality Feed: Select high-quality feed that minimizes waste and attracts deer effectively. Better feed types can reduce the need for frequent cleaning and maintenance, as they are less likely to spoil or attract unwanted pests.