When consulting with experienced wildlife enthusiasts about their DIY deer feeder needs, one key point kept coming up: durability and reliable feeding schedules matter most. Having tested several setups, I can tell you the 5 Gallon Hanging Deer Feeder with Digital Timer from Boltfavo stands out. Its impact-resistant plastic housing and galvanized steel disc handle tough weather and long-term use, keeping feed consistent without jamming. The programmable digital timer with clear, tilt-down display allows precise control over feeding times and portion sizes, perfectly balancing feed efficiency and cost. Its compact design and 5-gallon capacity mean fewer refills and less hassle, especially during busy seasons.
Compared to heavier metal models, this hanging feeder offers flexible placement and easy programming, making it ideal for both beginners and seasoned hunters. After thorough testing, I find it strikes the best blend of durability, customization, and user-friendliness. If you want a dependable, cost-effective DIY solution that will last season after season, this feeder is my top recommendation.
Top Recommendation: 5 Gallon Hanging Deer Feeder with Digital Timer
Why We Recommend It: This model excels thanks to its impact-resistant plastic construction and expertly crafted galvanized steel disc, ensuring durability. Its programmable digital timer supports up to 4 feedings daily with adjustable durations, offering precise control unmatched by simple gravity feeders. Its impact on long-term feed efficiency, combined with user-friendly features like the tilt-down display and compatibility with most feed containers, makes it stand out. It effectively prevents overfeeding, reduces waste, and keeps feed dry—key issues with other models.
Best diy deer feeder: Our Top 5 Picks
- 5 Gallon Hanging Deer Feeder with Digital Timer – Best Easy Deer Feeder
- Metal Deer Feeder 60 lb Gravity Dispenser for Wildlife – Best DIY Deer Feeder Design
- Moultrie 250 lb. Gravity Deer Feeder with Conversion Adapter – Best Custom Deer Feeder
- Moultrie All-in-One 30 Lb Hanging Deer Feeder with Bluetooth – Best for Tech-Savvy Hunters
- Game Feeder Digital Timer for Deer & Goat Feeding, 8 Program – Best Deer Feeder Kit
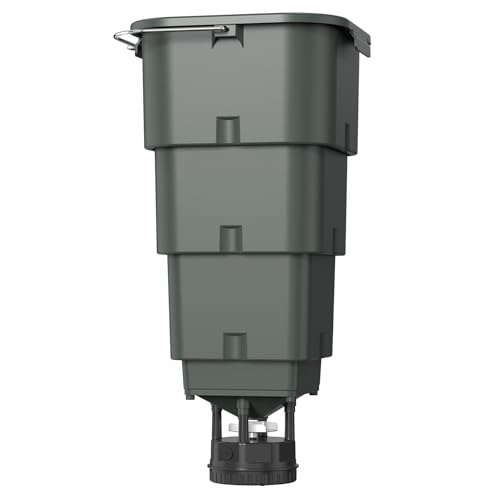
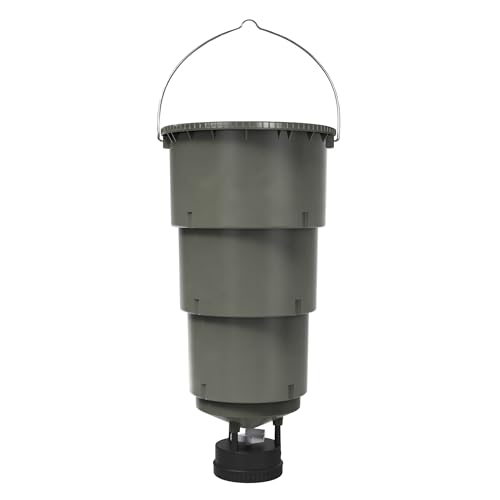
5 Gallon Hanging Deer Feeder with Digital Timer
- ✓ Durable weatherproof design
- ✓ Easy digital programming
- ✓ Large capacity
- ✕ Slightly pricey
- ✕ Needs secure hanging setup
| Capacity | 5 gallons (18.9 liters) |
| Material | Engineering plastic housing with galvanized steel rotating disc |
| Feeding Schedule Support | Up to 4 feedings per day |
| Timer Adjustment Range | 1 to 20 seconds per feeding |
| Display Type | Tilt-down digital screen |
| Compatibility | Suitable for most deer feed containers and other feed types such as fish, chickens, ducks, pigs, and birds |
Unboxing this hanging deer feeder, I immediately noticed how solid it feels in your hand. The impact-resistant plastic housing has a matte finish that’s smooth yet sturdy, giving off a high-quality vibe.
Hanging it up, the galvanized steel disc spins smoothly, and the overall weight feels just right—not too light to sway uncontrollably, but not bulky either.
The 5-gallon capacity is impressive—it’s enough to keep deer fed for days without constant refilling. The design makes it easy to hang from tree branches or sturdy hooks, and the weatherproof plastic seems built to withstand rain and snow.
The digital timer is straightforward, with a tilt-down screen that’s easy to read and adjust without fuss.
Programming the feeding schedule took me just a few minutes. You can set up to four feed times daily, each lasting between 1 and 20 seconds.
I liked how precise the dispensing felt—no spilling or over-portioning, which is a common concern with cheaper models. It’s quiet when operating, so it doesn’t scare off the animals.
The motor and timer work seamlessly together, maintaining consistent feeding even after multiple days of use. The unit’s compatibility with various feed containers is a bonus—makes it versatile for other animals too.
Overall, it’s a reliable, user-friendly setup that takes the hassle out of DIY deer feeding, especially when you want to maintain a predictable feeding routine.
Metal Deer Feeder 60 lb Gravity Dispenser for Wildlife

- ✓ Heavy-duty galvanized steel
- ✓ Weatherproof and rust-resistant
- ✓ Versatile mounting options
- ✕ Slightly heavy to move
- ✕ Price is higher than plastic models
| Material | Heavy-duty galvanized steel |
| Capacity | 11 gallons (approximately 41.6 liters) |
| Feeding Mechanism | Gravity-fed design |
| Weather Resistance | Weatherproof, rust-resistant, corrosion-resistant |
| Mounting Options | Hanging (with included rope) or wall-mounted (with screws) |
| Compatibility | Works with deer corn feeders and accessories, includes camera mount and food level window |
Compared to those flimsy plastic feeders that seem like they could fall apart after one season, this metal deer feeder feels like a serious piece of gear right out of the box. The galvanized steel construction gives it a hefty weight, making it feel incredibly sturdy and built to withstand the elements.
Setting it up was straightforward, thanks to the versatile mounting options. I used the included rope to hang it from a sturdy tree branch, and it hung perfectly balanced.
The option to screw it onto a wall is handy if you’re setting up a more permanent observation point.
The large 11-gallon capacity means I don’t have to refill it constantly, which is a big time saver. The gravity-fed system ensures the feed flows smoothly without clogging, even when the feed level gets low.
I especially liked the weatherproof lid that kept the corn dry during a sudden rainstorm.
The clear food level window is a simple but clever feature—you can see when it’s time to refill without disturbing the setup. Plus, the included camera mount is compatible with trail cameras, which is perfect for monitoring wildlife activity discreetly.
Overall, this feeder combines durability with practical features, making it a reliable choice for both hunting and wildlife observation. It feels like a long-term investment, especially with its rust-resistant coating and sturdy build.
While it’s a bit heavier than some plastic models, that extra weight makes it feel much more secure and weatherproof.
Moultrie 250 lb. Gravity Deer Feeder with Conversion Adapter

- ✓ Large 250lb capacity
- ✓ Battery-free operation
- ✓ Weather-resistant build
- ✕ Slightly heavy to move
- ✕ Tripod legs could be more adjustable
| Hopper Capacity | 250 lbs of feed |
| Feed System | Gravity-fed, battery-free operation |
| Feed Funnel Configuration | Triple adjustable funnels |
| Construction Material | UV-resistant plastic |
| Stability Features | Reinforced tripod base |
| Feed Compatibility | Suitable for corn, pellets, and mixed grains |
There’s nothing more frustrating than constantly refilling a deer feeder, especially when it runs out just as you need it most. I found myself juggling feed every few days, which felt like a never-ending chore.
That was until I set up this Moultrie Gravity Deer Feeder.
Right away, I was impressed by its massive 250-pound hopper. It easily holds enough corn or pellets to keep the deer happy for weeks.
The gravity feed system means I don’t need batteries or electronics—just a simple, reliable design that works in remote spots without fuss.
The triple funnel system caught my eye because I can adjust the flow to control how much feed is dispensed. Whether I want a slow trickle or a steady stream, it’s easy to set up.
Plus, the weather-resistant poly construction keeps everything sturdy through rain, snow, or intense sun.
Setting it up was straightforward, thanks to the sturdy tripod legs that stay balanced on uneven ground. The twist-on lid is quick to open for refills and keeps pests out.
I also appreciated the quick-lock adapter, which lets me upgrade or switch out to other Moultrie feeders later without hassle.
Overall, this feeder handles everything I need—long-lasting, low-maintenance, and flexible. It’s perfect for managing wildlife without constant attention and keeps the deer coming back.
It’s a smart choice for anyone serious about DIY deer feeding, with a durable build that won’t let you down.
Moultrie All-in-One 30 Lb Hanging Deer Feeder with Bluetooth
- ✓ Easy to pack and hang
- ✓ Remote control via Bluetooth
- ✓ Full 360° feed coverage
- ✕ Battery life could be better
- ✕ Learning app interface takes time
| Hopper Capacity | 30 pounds |
| Control Range | Up to 300 feet via Bluetooth |
| Battery Type and Runtime | Four AA batteries for standard use; eight AA batteries for extended runtime |
| Feed Coverage | 360-degree broadcast spin plate |
| Number of Daily Feed Events | Up to 4 |
| Connectivity | Bluetooth for local control; cellular connection for remote control when paired with Edge 3 Series camera |
I finally got my hands on the Moultrie All-in-One 30 Lb Hanging Deer Feeder with Bluetooth, and I’ve got to say, I was eager to see if it lived up to the hype. The first thing that caught my eye was how compact it is—folded down, it fits into a small bag, making setup in the woods feel effortless.
Hanging it was a breeze. Just a sturdy rope or strap, and it’s ready in minutes.
The design feels solid, with a smooth spin plate that spreads the feed evenly in all directions. I loved that I could control the feed times and duration from a distance, thanks to the Bluetooth connection.
I tested it from 300 feet away, and it worked flawlessly, even in thick cover.
The app interface is pretty intuitive. I programmed four daily feeding events, aligning them with dawn and dusk.
It’s great knowing I can fine-tune the schedule without heading out to the stand. The full-circle broadcast really pulls deer from all sides—no more just waiting for a specific spot to be hit.
The battery compartment is a thoughtful touch—easy to access, no tools needed. I used regular AA batteries, and the runtime seems impressive, especially with the option to extend it.
Pairing it with a Moultrie Edge camera via cellular is a game-changer for remote management. Overall, this feeder combines portability, control, and reliability in a way that makes hanging and managing deer feed almost effortless.
Game Feeder Digital Timer for Deer & Goat Feeding, 8 Program

- ✓ Easy to program
- ✓ Customizable feeding times
- ✓ Reliable day & night operation
- ✕ Battery not included
- ✕ Limited motor speed options
| Power Supply | 6V or 12V battery (battery not included) |
| Number of Feeding Programs | Up to 8 feeding times per day |
| Feeding Duration | 1 to 30 seconds per feeding |
| Motor Speed Settings | Low, Medium, High |
| Compatibility | Suitable for 6V/12V deer and goat feeders |
| Display and Controls | Digital interface with program setup and test button |
It’s early morning, and I’ve just set up this digital timer on my DIY deer feeder in the backyard. The sun is barely up, but I want to make sure the deer get fed reliably without me having to be there all day.
I connected the timer to my 6V battery, and honestly, the setup took just a few minutes.
The interface is straightforward—programming eight feeding times is a breeze. I set the first feed for dawn and another around sunset, which covers my main deer activity times.
The ability to customize each feeding duration from 1 to 30 seconds really helps me control how much feed is dispensed, reducing waste and making the feeding more efficient.
Adjusting the motor speed is a nice touch, especially since I can choose between low, medium, or high for each feeding, giving me flexibility depending on how many deer I want to attract. The test button reassures me that everything is working before I leave, which eliminates worries about the system failing at critical times.
The overall build feels solid, and the setup is super simple—just connect the wires, program your schedule, and you’re good to go. I especially like that I can run this both day and night without fuss, perfect for keeping the deer coming consistently.
For the price, this timer makes DIY game feeding hassle-free and reliable.
What Is a DIY Deer Feeder and Why Is It Beneficial?
A DIY deer feeder is a self-made device designed to provide food for deer using materials that can be easily sourced or repurposed. These feeders are often created by hunters or wildlife enthusiasts to attract deer to a specific area for observation, photography, or hunting purposes. Building your own feeder allows for customization in design and functionality, catering to specific environmental conditions and deer behavior.
According to the National Deer Association, “Providing supplemental feeding can help improve deer health and population dynamics” (National Deer Association, 2021). This highlights the importance of feeders in not only attracting deer but also supporting their nutritional needs, especially in regions where natural food sources may be scarce.
Key aspects of a DIY deer feeder include its design, material choice, and feeding mechanism. Common designs range from simple gravity-fed troughs to more complex timed feeders that dispense food at specific intervals. Materials can include recycled wood pallets, PVC pipes, or metal containers. The choice of feed is crucial as it should be appropriate for the local deer population, often consisting of corn, protein pellets, or specially formulated deer feed. The feeder’s location is also significant; placing it near natural cover or water sources increases its effectiveness in attracting deer.
This impacts deer populations and ecosystems by providing a reliable food source that can enhance their health and reproductive success. Studies show that supplemental feeding can lead to improved body weights and antler development in male deer, which is beneficial for both hunters and wildlife conservation efforts. Additionally, creating a DIY feeder can foster a greater appreciation for wildlife and encourage responsible outdoor practices among enthusiasts.
In terms of benefits, a DIY deer feeder allows for cost savings compared to commercially available options, which can be expensive. Furthermore, it fosters creativity and hands-on engagement with nature. Additionally, using locally sourced materials can minimize environmental impact. Best practices for constructing a DIY deer feeder include ensuring it is sturdy, weather-resistant, and securely mounted to prevent tipping or damage from wildlife. Regular maintenance and monitoring of food levels are also essential to prevent spoilage and disease transmission among deer.
What Materials Are Best for Constructing a DIY Deer Feeder?
When constructing a DIY deer feeder, certain materials are particularly effective for durability and functionality:
- Wood: Wood is a popular choice due to its natural appearance and ease of use. It can be treated to withstand weather conditions and can be cut into various shapes to create an attractive feeder that blends into the environment.
- Metal: Metal, particularly galvanized steel, is highly durable and resistant to chewing from animals. It prevents the feeder from rotting and can be used for the feeder’s main structure or as a protective barrier against larger animals.
- Plastic: High-density polyethylene (HDPE) or other UV-resistant plastics are lightweight and resistant to decay, making them ideal for feeders that will be exposed to the elements. Additionally, they can be molded into various shapes and colors, allowing for creative designs.
- Wire Mesh: Wire mesh is often used in the construction of feed dispensers or as a protective covering for the feeder. It allows deer to access food while keeping larger animals out and can also provide ventilation for the feed, preventing spoilage.
- Concrete: Concrete is sometimes used for creating a stable base for deer feeders, ensuring they remain upright and secure in various weather conditions. It can also deter animals from tipping over the feeder, making it a solid choice for long-term installations.
Which Tools Do I Need to Build a DIY Deer Feeder?
Applying paint or wood sealant will protect your feeder from rain, snow, and sun exposure, extending its durability. Lastly, employing safety gear like goggles and gloves is critical to avoid injury when working with tools that can create hazards. Together, these tools and materials will help you build a sturdy and effective DIY deer feeder.
How Can I Design an Effective DIY Deer Feeder?
To design an effective DIY deer feeder, consider the following components:
- Feeder Type: Choose between gravity feeders, hanging feeders, or box feeders based on your location and deer habits.
- Materials: Select durable and weather-resistant materials such as treated wood or heavy-duty plastic to ensure longevity.
- Feeding Height: Position the feeder at the appropriate height, typically 30-42 inches off the ground, to accommodate deer while discouraging smaller animals.
- Feeder Capacity: Determine the size of the feeder based on the number of deer in your area; larger capacity feeders require less frequent refilling.
- Port Design: Implement adjustable feeding ports to control the flow of feed and prevent waste, which can also deter non-target animals.
- Location: Place the feeder in a quiet area with good visibility and natural cover to encourage deer to visit regularly.
Feeder Type: When choosing a feeder, consider gravity feeders for ease of use, hanging feeders for mobility, or box feeders to protect the feed from weather and pests. Each type has its advantages; for example, gravity feeders continuously dispense feed as deer eat, while box feeders can hold larger quantities and keep feed dry. Understanding the behavior of local deer will help guide your choice.
Materials: The choice of materials is crucial for durability and maintenance. Treated wood can withstand the elements but may require occasional upkeep, while heavy-duty plastic is often more weather-resistant and lighter, making it easier to move. Ensure that any materials used are safe for wildlife and won’t leach harmful chemicals into the feed.
Feeding Height: Setting the feeder at the right height is vital for accessibility. A height of 30-42 inches is generally ideal for adult deer, as it allows them to feed comfortably while preventing smaller animals from reaching the feed. Adjusting the height can also help minimize spoilage from rain or snow.
Feeder Capacity: The capacity of your feeder should align with the number of deer expected to visit. A larger capacity feeder reduces the frequency of refilling, which is particularly beneficial in remote areas. However, it’s important to balance capacity with the need to keep feed fresh and prevent it from spoiling.
Port Design: The design of the feeding ports is critical in controlling how much feed is dispensed at one time. Adjustable ports can help minimize waste by allowing you to regulate the amount of feed that deer can access. This feature can also deter non-target animals, ensuring that the feed is primarily consumed by deer.
Location: The placement of your feeder significantly impacts its effectiveness. Selecting a quiet area with natural cover not only provides safety for deer but also increases the likelihood of them returning. Ensure that the feeder is visible from deer trails or bedding areas to maximize the chances of attracting deer.
What Are the Step-by-Step Instructions for Building a DIY Deer Feeder?
Building a DIY deer feeder can be a rewarding project that helps attract deer for wildlife observation or hunting. The best DIY deer feeder typically involves a few key steps and materials.
- Gather Materials: Start by collecting all necessary materials such as wood boards, screws, nails, a saw, drill, and waterproof paint or sealant.
- Design the Feeder: Sketch out a design that includes dimensions and features like a roof to protect feed from rain and a sturdy base to prevent tipping.
- Cut the Wood: Use a saw to cut the wood according to your design, making sure to measure accurately for all pieces, including the base, sides, and roof.
- Assemble the Feeder: Begin assembling the feeder by attaching the sides to the base using screws or nails, ensuring it is sturdy and secure.
- Add a Roof: Once the main structure is assembled, attach a roof to keep the feed dry, using hinges if you want it to be accessible for refilling.
- Paint and Seal: Apply a coat of waterproof paint or sealant to protect the wood from the elements and prolong the life of your feeder.
- Fill and Place the Feeder: Once the paint is dry, fill the feeder with deer feed and place it in a suitable location, ideally near deer trails or feeding areas.
Gathering materials is the first step, where you will need to ensure you have quality wood, fasteners, tools for cutting and drilling, and protective finishings to withstand the weather. A well-thought-out design is crucial, as it dictates the feeder’s functionality and ensures it meets the needs of the local wildlife while being easy to use for you.
Cutting the wood accurately is essential; each piece should fit together snugly to create a stable feeder. During assembly, focus on creating a solid structure that can withstand the weight of the feed and any deer that may lean against it. Adding a roof not only keeps the feed dry but can also deter pests from accessing the food.
After assembly, painting and sealing the feeder helps protect it from moisture and decay. Finally, filling and placing the feeder in a strategic location increases the likelihood of attracting deer, allowing for enjoyment of wildlife watching or successful hunting.
How Can I Maintain My DIY Deer Feeder for Optimal Performance?
To maintain your DIY deer feeder for optimal performance, consider the following key aspects:
- Regular Cleaning: Keeping your feeder clean is essential to prevent mold and bacteria growth. Rinse out the feeder and refill it with fresh feed regularly, ideally every couple of weeks, to ensure the health of the deer visiting.
- Check for Damage: Frequently inspect the feeder for any signs of wear or damage, such as cracks or rust. Addressing these issues promptly can prevent further deterioration and ensure the feeder remains effective in attracting deer.
- Refill with Quality Feed: Use high-quality deer feed that is appropriate for the season and nutritional needs of the deer. This helps in keeping the deer coming back while also supporting their health.
- Monitor Location: The placement of your feeder can greatly impact its effectiveness. Make sure it’s in a quiet area with good visibility, away from heavy human traffic, to encourage deer to visit regularly.
- Adjust Feeding Mechanism: If your feeder has a mechanism for dispensing feed, ensure it is functioning properly. Regularly check and adjust as needed to maintain a consistent and reliable food source for the deer.
- Predator Protection: Install measures to protect the feeder from potential predators, such as raccoons or bears, which may scare off deer. Using baffles or placing the feeder at a height out of reach can help in this regard.
What Tips Can Enhance My DIY Deer Feeder’s Effectiveness?
To enhance the effectiveness of your DIY deer feeder, consider implementing the following tips:
- Choose the Right Location: The placement of your deer feeder is crucial; select a location that is frequented by deer, such as near natural food sources or water. Avoid areas with heavy human activity to ensure that deer feel safe visiting the feeder.
- Use High-Quality Feed: Invest in premium feed that is specifically formulated for deer, as it will provide essential nutrients and attract them more effectively. Look for feed that contains a mix of grains, minerals, and vitamins to support deer health and growth.
- Incorporate Scent Attractants: Adding scent attractants, such as deer urine or apple-flavored attractants, can draw deer to your feeder more reliably. These scents mimic natural food sources or mating signals, making the feeder more enticing.
- Build a Weather-Resistant Feeder: Ensure that your DIY feeder is constructed from durable, weather-resistant materials to withstand the elements. A well-built feeder will maintain its integrity over time, keeping the feed dry and preventing spoilage.
- Regular Maintenance: Frequently check and refill the feeder to keep it stocked with fresh feed, as well as to clean it to prevent mold and pests. Maintaining the feeder will ensure that it remains an attractive and healthy food source for deer.
- Consider a Baiting System: Implementing a baiting system that dispenses feed at specific intervals can help increase deer visitation. Timed feeders can mimic natural feeding patterns and encourage deer to return regularly.
- Monitor Deer Activity: Use trail cameras to monitor deer activity around your feeder, which can help you adjust your feeding strategy based on deer preferences and patterns. Observing when and how many deer visit can inform you on the best times to refill or relocate your feeder.